This article helps to understand the intricacies of authorization using JSON Web Token, learn how a token works, and what typical tasks are solved using such authorization. The issue of security will be addressed as well.
In terms of authorization, different processes refer to that term. User verification implies identification, authentication, and authorization. But these concepts must be separated for a correct understanding of the topic:
- Identification. This is the first stage, where the user is asked the question “Who are you?”. As a response, the user provides his login, email, etc.
- Authentication. At the next stage, the user confirms that he is who he claims to be. To do this, he enters a password, proving registration in the system.
- Authorization. At the final stage, the system checks that the user who has confirmed his identity has the right to access the resource.
This article will focus on authentication. The term “authorization” often means authentication, so in this material, the terminology will be used interchangeably in the same sense.
Session-Based Authentication
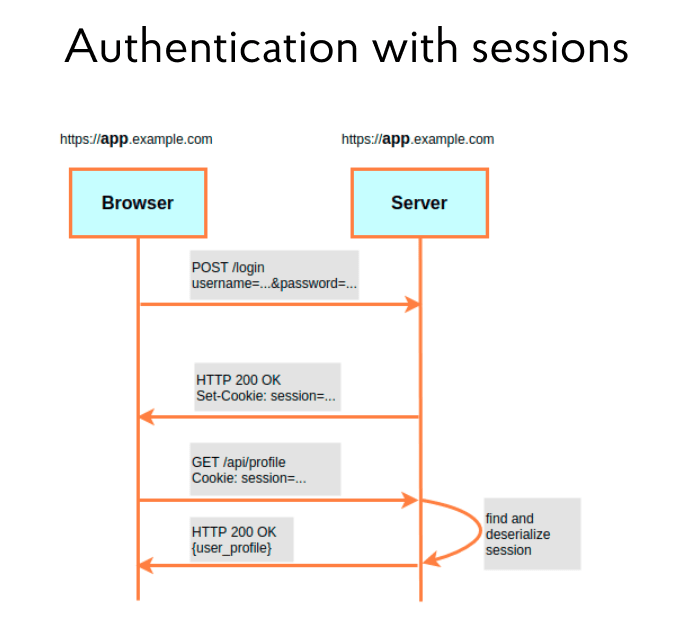
The illustration below shows a traditional session-based authentication scheme. It works according to the following principle. Let’s imagine a front-end application in the browser and a back-end on the server. When a user enters his credentials, username, and password in the front end to log in, the server checks them in the back end. If everything goes well, it confirms the user’s authentication by returning a “200” response and adds cookies with the Session ID. After that, the user session starts, and he can work with the system. When the user makes new requests, the browser sends them to the server and automatically supplies each of them with the same Session ID. The tasks of the server at this stage are: to extract these cookies from the request, parse them, and check their accuracy. If all is correct, the user session is valid and the requested content can be sent back to the user.
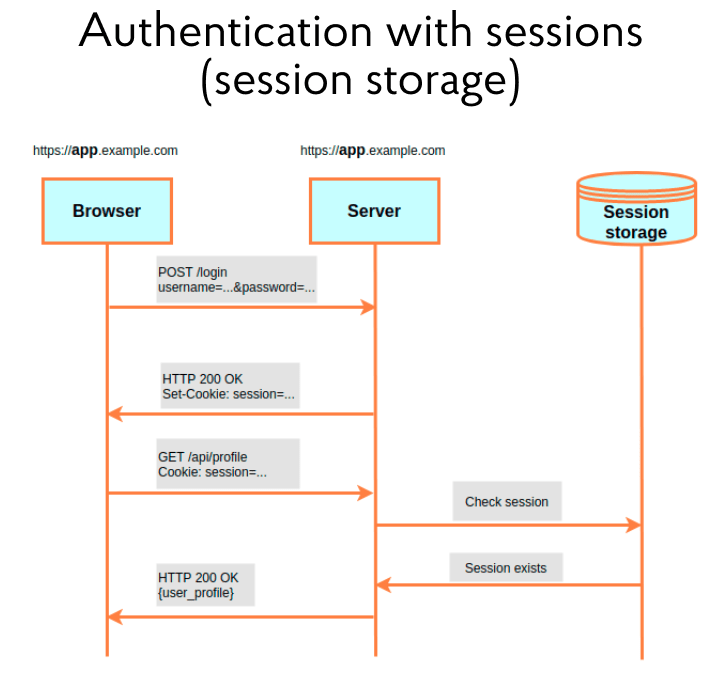
But with this approach, it is necessary to understand: the session identifier should only sometimes live by itself but also store certain information. For example: what role the user has or what products he viewed. However, the browser does not allow you to write too much data in cookies. For this reason, such a concept as Session storage has appeared. It is a place on the server to store information linked to the Session ID. Almost all modern frameworks offer a wide range of options for Session storage: server file storage, main or additional database, and key-value storage (for example, Redis).
The scheme described works great within a single domain, but causes certain problems in the architecture with microservices. It is illustrated in the diagram below and shows two Protected Endpoint services. They are protected and must provide resources to users on request. The system also has an Authentication Server. This server is responsible for the initial user connection and validation of the Session ID, which the user forwards to their request.
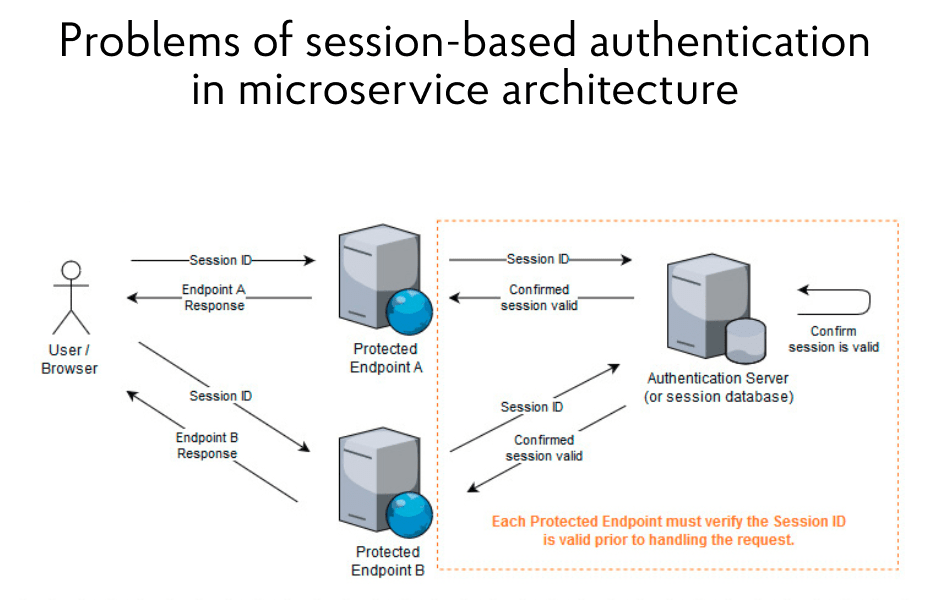
With such an architecture, one problem is visible: if a user must access several secure endpoints to get, say, a dashboard, then each of them must check the validity of the Session ID and contact the authentication server for this. In such a case, this server will sooner or later become a bottleneck and slow down all processes, regardless of how the architecture changes. It’s possible to put an authentication server in front of the Protected Endpoint – that is, declare it as an API Gateway. Another option is to allow secure endpoints to connect directly to Session storage. However, the Session ID check will remain the so-called bottleneck.
Moreover, when setting a cookie, it is possible to specify which domain it belongs to. Then the browser will not substitute it in the request when accessing other domains. But if the protected endpoints of the microservices are on different domains, it will be challenging to set a cookie with the Session ID. In addition, CSRF attacks are possible, because they are aimed at cookies with content that provides users with access to protected resources.
JSON Web Tokens
Considering these problems, many years ago, the developer community came up with the idea to use a particular string that, on the one hand, cannot be faked, and on the other hand, can be checked for validity by each resource server. As such a string, it turned out to be convenient to use JWT — JSON Web Token.
JWT is a string made up of three parts, separated by dots. The meaning of each part is given on the right side of the illustration. The first is the header, the title of the token. It specifies the algorithm and type. The second part is the payload. This is the payload or information contained in the token. There are both standard fields (the date the token was created and when it will be expired) and additional ones (they can be added in JSON format). The header and payload pass through base64-encoding independently of each other.
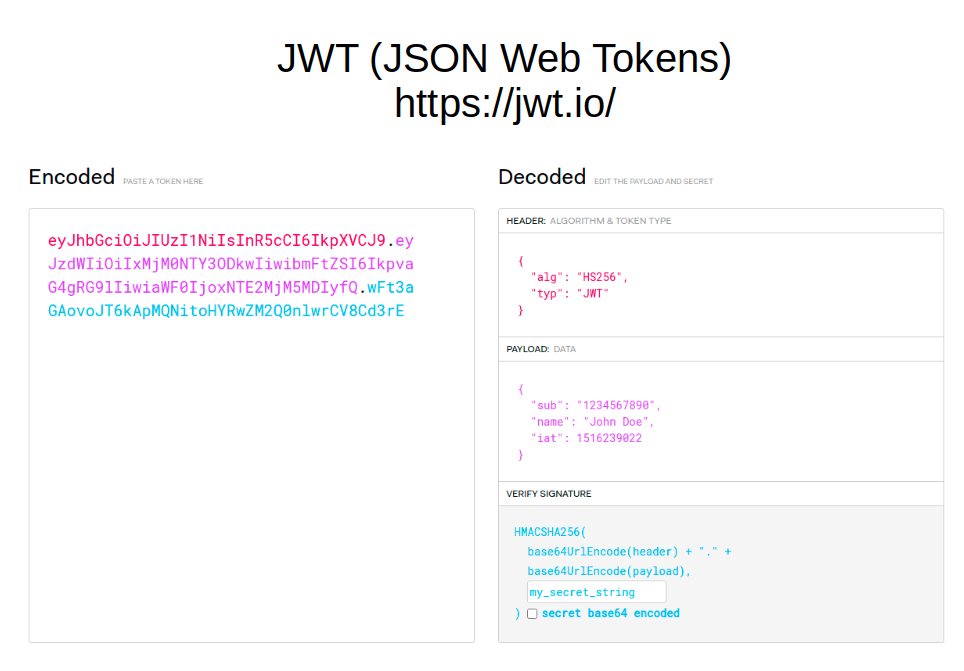
But the most important thing is the third part of the line. This is what makes the token tamper-proof. Here you can specify a secret key — a string that is used for encryption by a one-way function. When the token is encrypted, all information on the right turns into a string on the left. At the same time, opening back the first and second parts will not be difficult for any user who has the same two-way algorithm. But no one can read what is written in the third part — and, accordingly, no one can forge the token. If an attacker, for example, specifies a different username in the second part, then the signature in the third part will also change. But since the attacker doesn’t have the secret key, he won’t be able to sign the token correctly. JWT simply won’t be valid. Thanks to this, any server that has a secret string for signing the token will be able to check its validity and pull information from the second part of the payload.
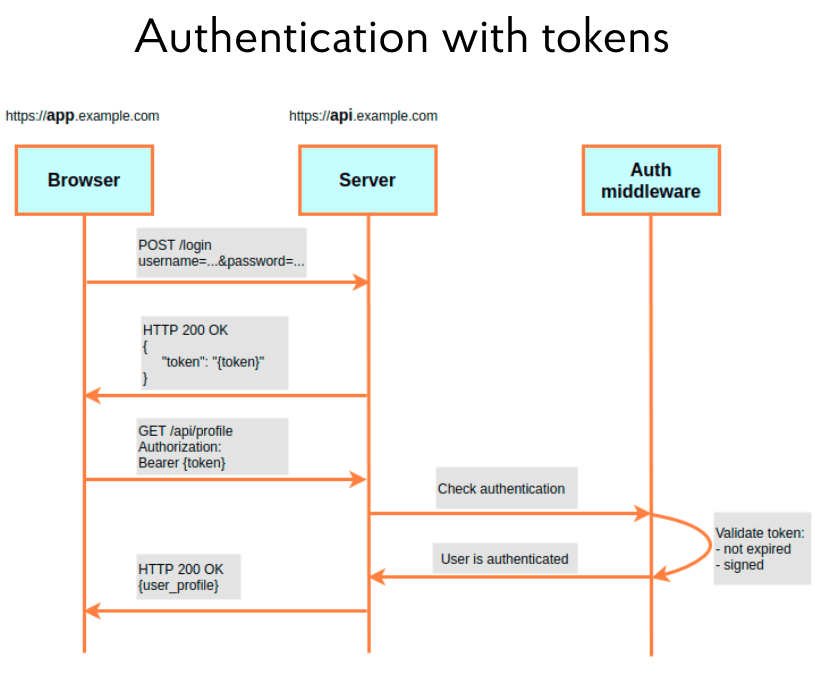
Let’s move on to the next scheme in the illustration below. It is similar to session-based authentication, but there is one difference. After introducing credits, the server gives the user no cookies with a Session ID, but a token. The client application then adds the token to each request as a special Authorization header. At the same time, it enters the word “Bearer” into it, and after the space, the token itself. The scheme also shows Auth middleware. This is a fairly standard part of any framework that can check, in particular, the validity of a token. That is, processing on the server passes the verification stage. The user is authenticated if the token has not expired and is correctly signed with a secret string. Consequently, when using the microservices architecture, it is not necessary to execute all requests to the resource servers through the authentication server. Each server can have a secret string and independently check the token’s validity.
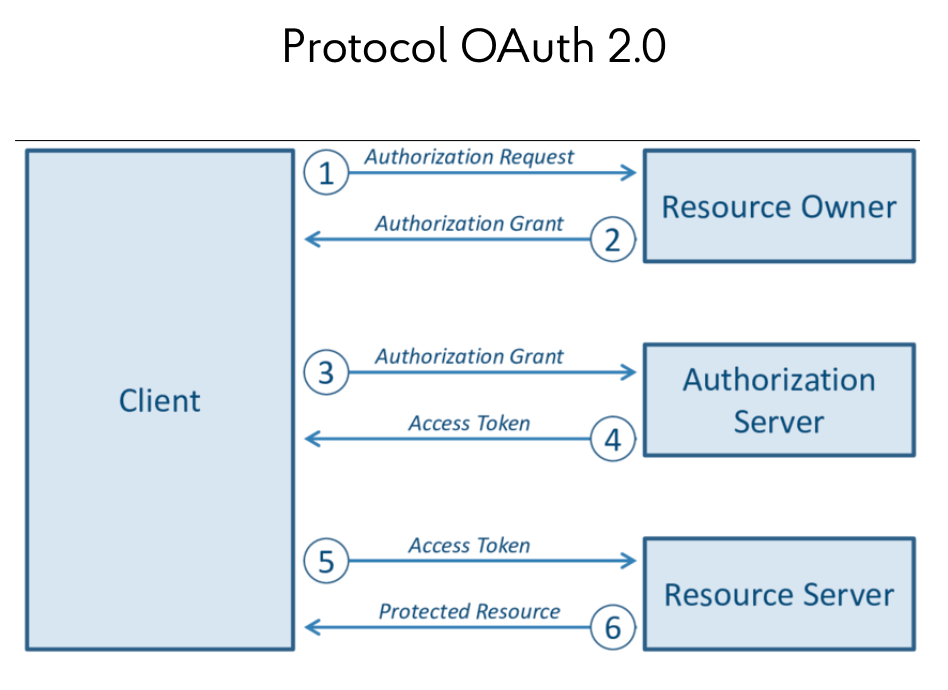
In the context of the JWT discussion, it is worth mentioning the OAuth 2.0 protocol, which is built on top of this framework (see the scheme below). It allows users to log in to applications and receive a token for accessing resource servers, using, for example, Google or Facebook apps. In this case, identification and authentication are shifted to third-party providers:
Separately, it is worth paying attention to access- and refresh-tokens. Typically, an access token is a short-term token that is used several times by an app to access a server. When the token expires, it is possible to contact the server to renew it. This is what a refresh token is for. It is disposable, but has a longer life and allows getting a new pair of tokens. The scheme of their use is given below:
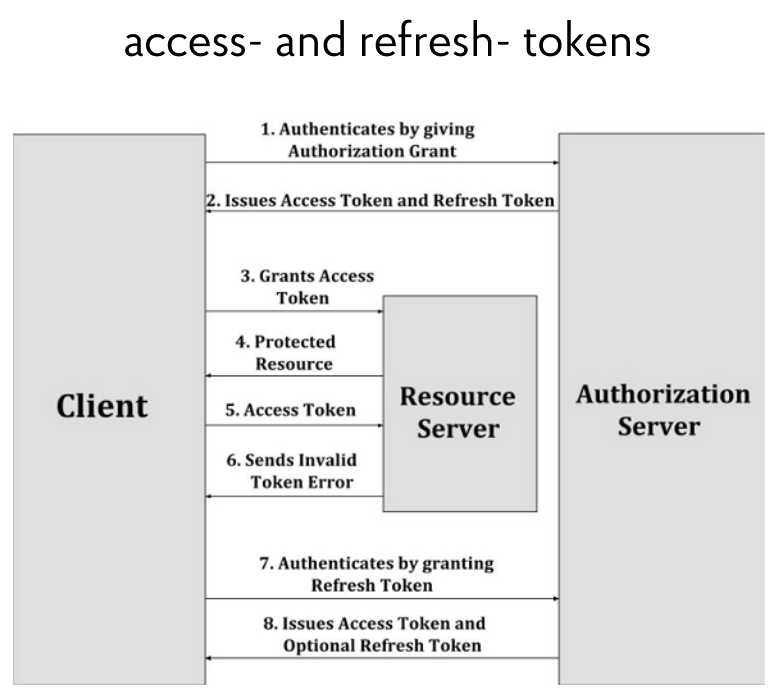
Thanks to this solution, it becomes possible to protect the user. If an attacker steals an access token in an unsecured http connection, he will not be able to use it for a long time. After a certain amount of time, the access token will lose its validity. A real user with his refresh token can get a new pair, but an attacker will not.
Problems with using tokens
As with any technology, there are some limitations and issues with tokens. They must be understood and correctly handled with JWT when used in projects. It was noted earlier that the token could be verified by the resource server no matter what, just the secret string is enough. But this leads to a problem: if a user is given a new pair of tokens, and the old pair is still valid, then there is no means to expire it. After all, the token itself is a string that is not stored anywhere. As long as it is valid, it can be used. As a result, the user can get a second pair, a third, a fourth — and the previous ones will still be functional.
The next difficulty is that a full-fledged logout is not possible. In the front-end application, after pressing the logout button, the user is sure that he is disconnected from the system. However, the tokens given to him will live for some more time! For the same reason, it is impossible to log the user out if the token is lost or stolen.
And there are also problems when stealing a secret string. Yes, it doesn’t happen often since this key is on the server. But if the string is stolen, then every token will be compromised.
In addition, there are problems with storing tokens at the front end — they are often placed directly into local storage. It is more convenient for the developer, but it requires additional funds to improve the security system.
Various typical tasks using JWT
Today, projects must solve tasks that go beyond the scope of the described tokens, but at the same time, they are based on their use. The first task of this kind is the lockout mechanism. It involves blocking the user after several unsuccessful authentication attempts. There is no need to dwell on this problem in detail, it is quite simple. If a user entered the correct name or email several times in a row, but the wrong password, this user should be blocked for a certain time. To do this, it is needed to record the number of unsuccessful attempts and set an access lock if this indicator is exceeded, for example, in a database or intermediate storage.
More interesting tasks are Logout and Only one active device, which are related. Logout assumes that after pressing the logout button in the front-end application, it is also necessary to invalidate the tokens themselves with the exit confirmation, making them invalid. As for Only one active device, this task allows the user to be simultaneously logged in on only one device. If he logs into the account from another device, then the tokens issued to the first device should lose their validity. More details about the implementation of both mechanisms will be discussed below.
Another interesting task is with automatic logout. It is often found in applications, and for some types of apps (for example, those that give access to sensitive or financial information) it is even mandatory. The bottom line is this: if the user logged into the application is inactive for some specified time, then he should be automatically logged out of the system without the possibility of using it again until the credits are re-introduced.
Logout and Only one active device
The Logout and Only one active device authorization tasks are worth considering. The tokens themselves are designed to be stateless, meaning they are not meant to be hosted on a server. The idea is to ensure that it is possible to store their information on the server. The methods may vary. For example, you can create a blacklist for tokens that should become invalid. Such tokens will be stored in the “black list” until the expiration date of their use. On the other hand, it is possible to create a whitelist on the server, which may even be somewhat easier. This list will become a registry of issued tokens that the system can check against. If the token introduced by the user is not expired and is part of the “white list”, then it is valid.
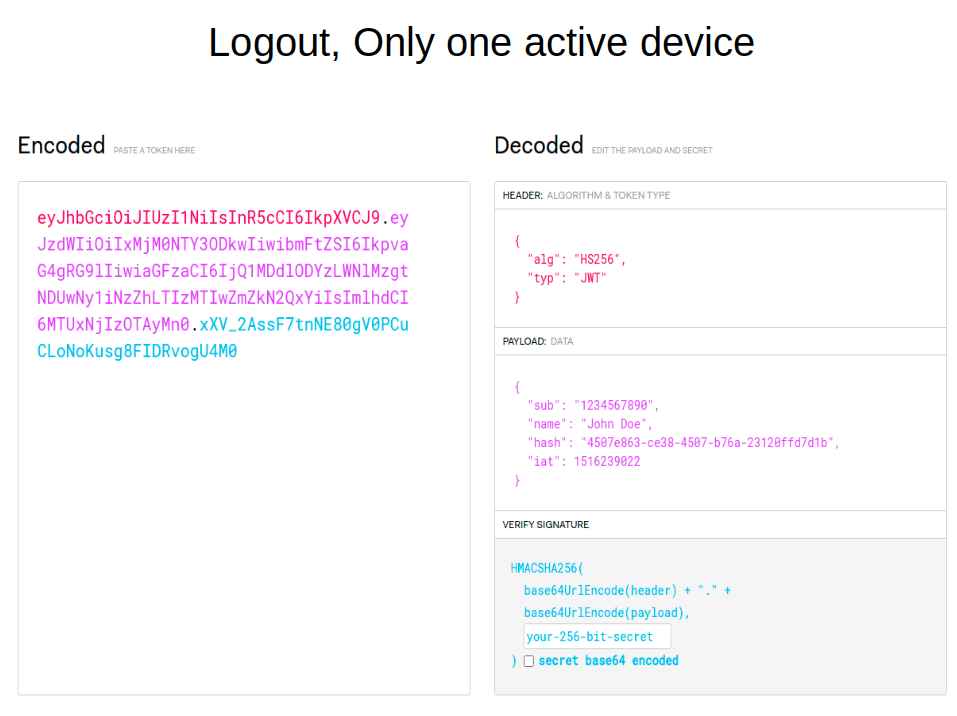
Storing the tokens themselves in the database can hardly be called secure. Is there a way to get through this situation? Yes. The illustration below shows that a hash item has been added to the payload section. This is some randomly generated string. It is recorded in the payload of the token and the storage on the server, linked to the user ID. When a user presents a token, the system parses it and checks the validity of the token and its signature with a secret string. It then pulls out the hash and checks it against the user ID in the store. This can be a key-value store, a core database, or another store provided by a modern framework.
Due to the use of the hash field, the scheme of interaction between the client and the server becomes like this (see the following picture). First, the browser sends credits to the server. The server checks them and, if the data is entered correctly, writes a bunch of User ID and hash for access- and refresh-tokens to Token (hash) storage, and then gives them back. Next, the user’s browser presents the access token to the API. To verify the authentication, the service goes back to the database, finds the hash with the User ID, and if all goes well, returns a response with the requested information.
To log out, the hash is needed to be removed from the database. The next time the user requests with this token, the check will show that there is no such hash. This means that the user has logged out of the system before.
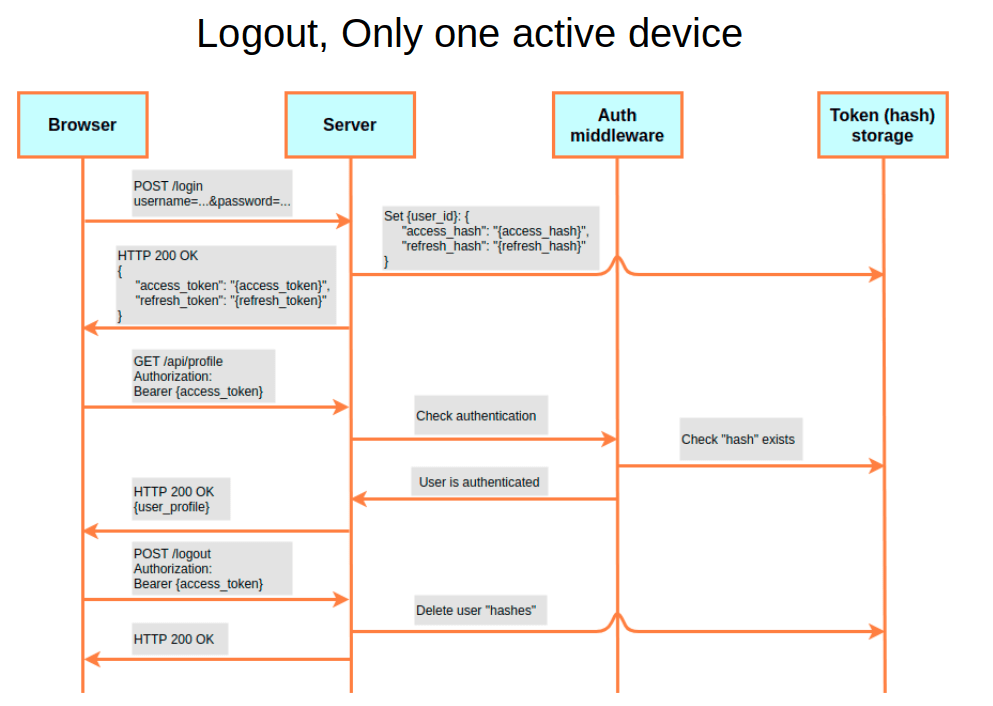
How is it related to Only one active device? If the database is allowed to store several hashes for various access or refresh tokens for each User ID, the user can log in simultaneously from different devices. But if only one hash for each User ID is allowed to be stored in the database, then this will be the implementation of Only one active device. Once the user logs in from a different device, the old hash is overwritten. Because of this, the previous device will no longer be able to access the server.
Automatic logout
A lot of questions in practice arise with automatic logout. It may be possible to decide how the process of manipulating the validity period of access- and refresh-tokens can be solved. That is, after the user contacts the backend, the system gives him these tokens with a validity period that is clearly needed for automatic logout. And then if the token is expired, the logout will take place. The illustration below shows such a scheme:

But there is a problem. For example, a user should be automatically logged out in case of inactivity for 10 minutes. By inactivity, it should be understood that no one has accessed the server. If at time zero the user logged in, he was issued an access token for 10 minutes, but the refresh token is “long-term”, as intended in the architecture, the following situation may arise here. If the user contacts the server before the expiration of 10 minutes, then the access token is still valid, and the user receives resources. But if he sends a request after 11 minutes, the access token will be invalid. It seems that an automatic logout should occur, but the refresh token is still valid. As a result, the user can contact the endpoint and receive a new pair of tokens. Therefore, such a scheme is not suitable.
The scheme below shows an alternative option – when access- and refresh-tokens have the same validity period. If at time zero, the user received a pair of tokens and connected to the API at the ninth minute, then this pair of tokens is still valid. And this, in theory, should reset the counter and allow the user to access the back end for the 19th minute (9 expired plus 10 new ones). However, when the client requests resources at the 11th minute, his token pair will turn out to be expired. Therefore, credits will need to be re-introduced, which means that the task has not been solved. What to do?

As a solution, if a sufficiently long automatic logout period is set (say, 2 hours), then it is possible to leave 2 hours as the validity period of the refresh token, and for the access token, this parameter should be limited to a minute. Then, in case of inactivity for “2 hours + 1 minute”, the user will be logged out of the system. However, it is also wrong to change the access token too frequently, along with the access and refresh tokens after each call to a secure endpoint.
This problem can be solved by using the automatic record expiration mechanism, which is implemented, in particular, in the Redis key-value database. In this case, it is not the lifetime of the tokens which is manipulated, but the length of time a pair of tokens is stored in the database. This parameter is referred to as TTL. The illustration below shows such a scheme.
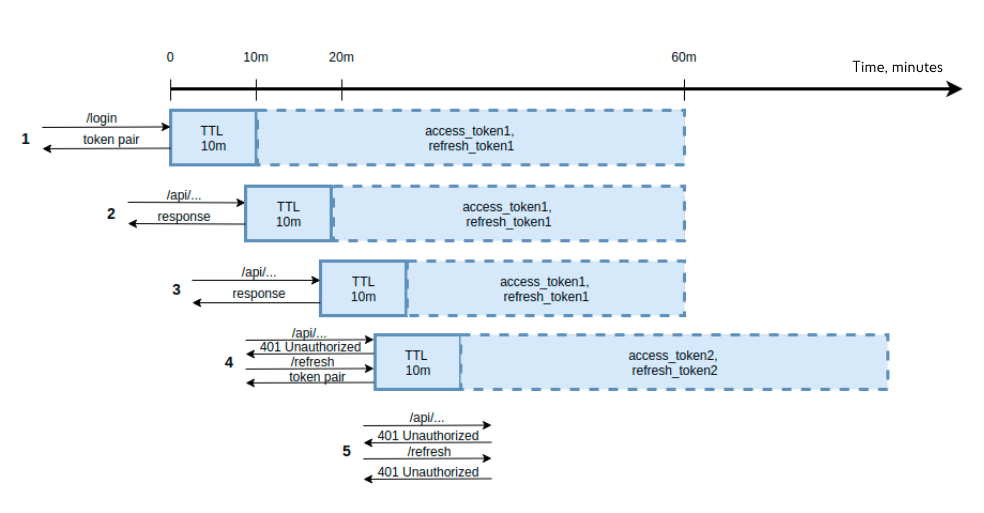
For example, the automatic logout should occur after 10 minutes of user inactivity, the access token is valid for 20 minutes, and the refresh token — is for 60 minutes.
At time zero, the user goes through the authentication procedure and receives a pair of tokens. At the same time, tokens are being written to Redis with TTL, 10 minutes.
The second stage shows the user accessing the API in 9 minutes. Since the automatic logout has not expired, the user receives the requested resources, but the TTL in Redis is shifted by 10 minutes.
Step three of the diagram: the user makes a request at the 19th minute, he still has a valid access token, and he still receives resources.
At the fourth stage, when the user contacts after the 20th minute with an expired access and valid refresh token, he will receive a new pair of tokens. They are also written to the Redis database with a TTL in 10 minutes.
The fifth step shows how the user accesses the API after 15 minutes. In this case, the automatic logout has expired. And when the Authorization Middleware goes to check the record with tokens in Redis, it will not find anything — the data in Redis was expired and automatically deleted. Everything is working the way it should.
Session vs. JWT
Assuming that the session mechanism has been rediscovered, there is some truth to this. The token is needed to confirm the user’s authentication. And the session identifier is a sign of the user session: whether the user is currently in the system, whether he can work with it, or whether the session has ended.
Such a slightly sarcastic picture can be come across on the Internet:
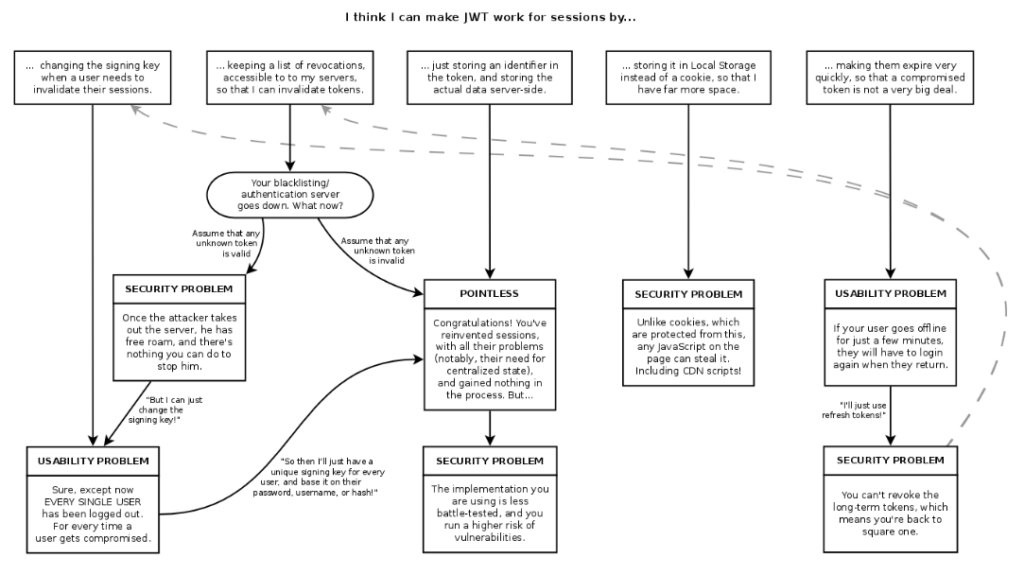
It shows how attempts to use a JWT as a session identifier lead to the same problems as with sessions. Once the user wants to log out, the token must be invalidated and the secret string modified. But when this key is changed, all users will be logged out. If the secret string of only this user is changed, then storage for such keys is needed. As a result, everything comes down to actually reproducing the session mechanism. After all, initially, JWT did not require storages but it turned out that certain problems can’t be solved without them.
However, this approach has the right to life. Moreover, it is not always possible to correctly implement some features through sessions. For example, it is difficult to recognize and show the correct message to the user. This depends on whether the token or session has expired or whether the user has connected to a second device and is disconnected from the first device. Therefore, with the session mechanism, the same tasks should be solved, as with the help of tokens.
It is necessary to carefully approach the choice of technology. It all depends on the project. Tokens are good because they are used everywhere, and sessions are good because of thoughtful solutions that have proven their effectiveness over the years of use by developers. As an experiment, it is possible to try to create a mixed version of the two mechanisms.
Best practices in JWT
And in conclusion, here are the best practices when using this type of token, which should be followed:
- Ensuring the security of the connection. The HTTPS protocol allows, for example, to prevent the Man-in-the-Middle attacks, when an attacker can spy on the tokens transmitted in the header.
- Storing strings in a secure location on the server. This seems to be obvious, but sometimes such strings can be stored in inappropriate places (for example, in a directory on a server with open public access).
- Do not store tokens in the database. An identifier, which is also contained in the token, can be stored in the database. By the identifier, it is possible to check the token.
- Work with a couple of tokens. There is no need to repeat about short-lived access- and long-lived refresh tokens. It is enough to mention them.
- Do not store tokens in the browser’s local storage or session storage. This storage method is sensitive to XSS attacks. Any code that an attacker manages to execute on the page of other users can access local storage. Tokens can be placed in such storage, but then it is important to remember to protect the system from XSS attacks.
- Always validate user data. Leaking special characters when displaying data on the page also needs to be added here. Such mechanisms make it impossible to run someone else’s code on the server.
- Limit sources of downloadable resources. This will require the Content-Security-Policy header. If only the JavaScript code loaded from the server should be executed, then it is needed to write self as the Content-Security-Policy. Then JavaScript code from other sources will not be able to run on the page.
- HttpOnly cookie flag and Same Site constraint. For cookies, there are such implementations of access and refresh tokens, where the former is sent in the response body, and the latter is in the cookie. As a result, it is possible to get away from the need to store it in local storage. Though, there is a need to protect against CSRF attacks. The use of the HttpOnly flag for cookies and the SameSite restriction, which is now actively introduced by browsers, will help with this.
- CSRF tokens. A good defense mechanism against CSRF attacks is to use CSRF tokens — special tokens that the server sends to the client in a cookie, with each request from the client to the server accompanied by a cookie with this token and/or an X-CSRF-Token HTTP header containing this token.
Using JWT is a good tool with a rather interesting range of tasks to be solved. However, there is not one solution that is correct and unambiguous in this regard. The issue of system safety should always be addressed comprehensively and a variety of options should be developed in great detail.


