The Java Spring Framework is a powerful, helpful, and popular tool for Java developers. However, beginners need help understanding the framework and the massive amount of information available on many websites and books about its functionality. So, in this guide, we collected all the fundamental aspects of working with the Spring Framework in Java. It will help newcomers structure their knowledge and master this framework faster. Additionally, for a structured learning path, consider enrolling in our free Java course.
What is Spring Framework?
At its core, the Java Spring Framework is all about simplifying your work as a Java developer by enabling quicker and more secure feature implementation. Think of it as your trusty sidekick in the world of programming, boosting your productivity and unleashing your creativity. Spring’s fundamental principle is minimal intervention; as the official website states, Spring makes Java programming more accessible and productive.
Benefits of Using the Spring Framework
- Simplified Development: Spring reduces the complexity of Java development by providing robust features such as dependency injection and aspect-oriented programming.
- Increased Productivity: Java Spring’s extensive libraries and templates allow developers to streamline everyday tasks, leading to faster development cycles.
- Enhanced Testability: Spring’s support for unit testing and mocking frameworks enables developers to write comprehensive test suites, ensuring the reliability of their applications.
Spring Framework Modules
The Spring framework consists of about 20 different modules, each of which plays a unique role within the framework. Springs are modular, and programmers can use various modules independently or together to create robust applications. Here are the main group of spring modules:
- Core Container: This includes the core, beans, context, and expression language modules, which provide the framework’s fundamental parts.
- Web Module: Includes Spring MVC and WebSocket modules, supporting the development of web applications and real-time communication.
- Data Access / Integration: Comprises modules such as JDBC, ORM (Object-Relational Mapping), JMS (Java Messaging Service), and Transaction Management, providing a consistent data access strategy and integrating with popular frameworks like Hibernate and JPA.
- AOP, Aspects and Instrumentation: Supports aspect-oriented programming implementation, allowing separation of cross-cutting concerns.
- Tests: Offers comprehensive testing support to ensure the reliability and quality of applications.
While we won’t dive into all of them in this article, we’ll focus on the essential Core module. We’ll help you grasp the core concepts of Spring Framework in Java, like how it manages dependencies and integrates into applications.
Key Concepts of the Spring Framework
Starting on your Java Spring journey might throw a bunch of new terms your way, leaving you scratching your head. Sadly, many beginner guides tend to breeze past these critical terms, assuming you’re already in the know. But it’s essential to spend time introducing key concepts right from the get-go:
- Framework. It is a platform packed with ready-made solutions for standard application configuration tasks. Developers can integrate the framework into their applications and focus on the core logic.
- Dependence. Also known as a “dependency” refers to a class essential for the proper functioning of another class within the system.
- Annotation. It is a shortcut in the source code that a compiler or interpreter uses. In the context of Spring, the framework does it.
- Bean. A Java class crafted according to specific conventions. Beans help to group objects, which simplifies data transfer.
How To Apply Spring Framework in Java
The Java Spring framework is versatile and can be applied in various scenarios:
- Web Applications: Spring MVC (Model-View-Controller) supports creating robust web applications with a clear separation of concerns.
- Microservices: Spring Boot simplifies the development of microservices, providing a ready-to-use environment.
- Data Access: Spring Data facilitates data access and manipulation, supporting a wide range of databases.
- Security: Spring Security offers comprehensive security services, including authentication and authorization.
- Cloud Applications: Spring Cloud provides tools for building distributed systems and managing cloud deployments.
Spring Framework Features: IoC & DI
Inversion of Control and Dependency Injection
Spring is often referred to as an IoC container, and while this is true, it doesn’t fully capture the framework’s functionality. One must first understand the concept of Inversion of Control (IoC) to grasp its significance. Thus, examining a program without Spring is helpful to illustrate this.
Inversion of Control is a fundamental principle of object-oriented programming that enhances code modularity and reduces dependencies between components. When class A relies on class B to function, it becomes dependent on class B. Essentially, one class becomes reliant on another, akin to a car’s dependence on its engine.
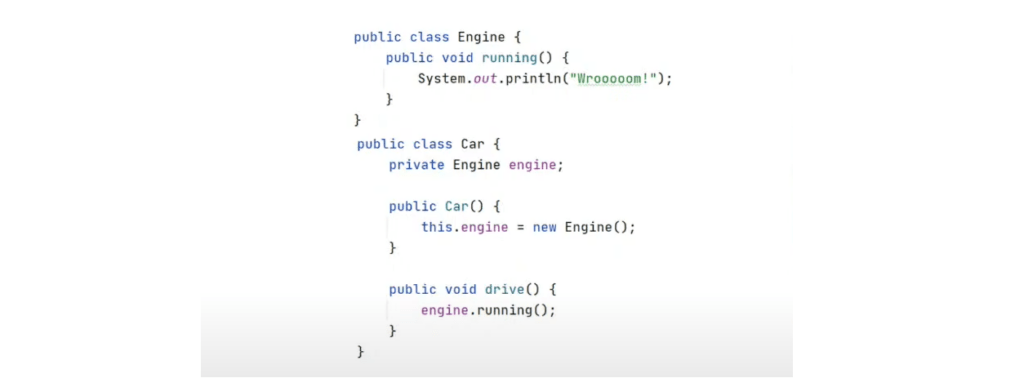
For instance, the code without IoC might resemble the illustration below. The Engine class contains the run method, which, for example, will start the car’s engine. To activate the drive() method, you first need to create an instance of the Engine class. Consequently, the system must ensure that the engine is in working order.

This approach has two significant drawbacks:
- A high degree of connection between classes, which makes it impossible to develop and modify them independently;
- The application code as a whole is difficult to change, maintain, and update.
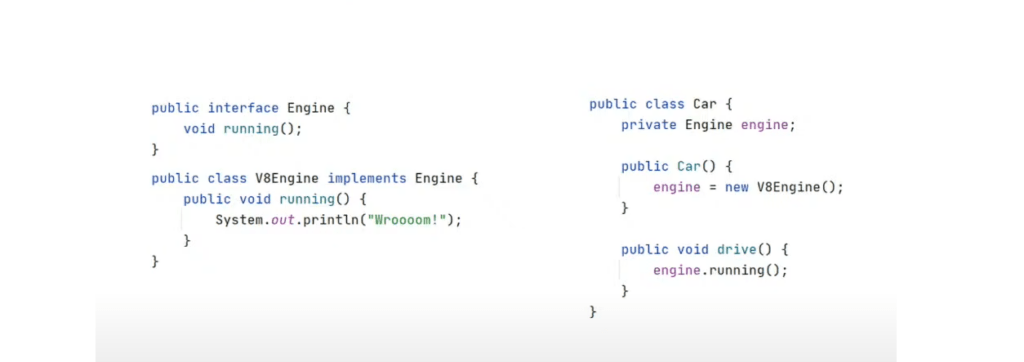
However, the code from the example can be improved using an interface. Thanks to it, it can easily change the engine (for example, to V8Engine) without altering the drive() method. Yet, managing the chosen implementation remains challenging, mainly when dealing with numerous deployments.

It is where IoC helps. By implementing Inversion of Control, dependency creation is delegated outside the class, eliminating the need for a new operator every time an element is created. IoC allows you to add new dependencies from external sources without modifying the source code.
In Spring, Dependency Injection (DI) is the most commonly used approach for implementing IoC. However, DI can be utilized independently of the Spring framework. One such method is called Setter Injection, illustrated below. Here, a setEngine() method is introduced, allowing the engine to be passed from the outside, negating the need to create each Engine object manually.

Dependencies can also be used through Constructor Injection when arguments are passed through the constructor. As you can see from the illustration below, there are fewer dependencies thanks to IoC, which makes it easier to modify and extend classes.

However, despite these advancements, class creation still necessitates using the new operator. It is where the Spring framework comes into play.

Spring Beans
In Spring, each class is called a bean, similar to JavaBeans, which adhere to standards such as having a constructor without parameters or get- and set-methods. While Spring beans are identical to those classes, they are not subject to such strict rules.
Scopes of Beans
- @Scope(“singleton”). By default, Spring beans are singletons, meaning each bean has a single instance throughout the IoC container. It ensures efficient use of resources since the system will return the same reference to the already created object for each subsequent request for this bean.

- @Scope(“prototype”). In contrast to singleton, prototype scopes create a new instance of the bean for each dependency. It is beneficial when different states of beans are required for each use. However, it’s crucial to note that prototype dependencies only function correctly within components with a corresponding scope. Using prototype dependencies in singleton components is discouraged, although this limitation can be circumvented using Method Injection (read more here).

- Scopes for web applications. Web applications have separate scopes that can limit an object’s life cycle. Scopes can be configured within a request, session, servlet, and websocket.
Understanding Bean Lifecycle
A bean undergoes several initialization steps before becoming available. To manage its lifecycle, two annotations are utilized:
- @PostConstruct. This annotation marks a method to be executed immediately after the bean’s constructor.
- @PreDestroy. The method will be called before deleting the bean.
These methods help add or reduce resources—some work for singletons, some for prototypes. However, the @PreDestroy method is unavailable for prototype beans because each dependency has its own separate object.
Stereotype Annotations in Java Spring
In the Spring Framework, annotations play a critical role in defining and managing beans within the application context. The @Component annotation is one of the primary annotations used for this purpose. It marks a class as a Spring-managed component, which allows Spring to detect and register it during component scanning automatically. Spring also provides specialized stereotype annotations that serve similar purposes but offer additional semantics and functionalities tailored to specific layers of an application.
The @Component has equivalents: @Controller, @Service, and @Repository. But they are virtually identical and serve as markers instead of @Component. While they are functionally similar, each may possess unique features over time. For example, @Repository is adept at handling Dao exceptions for repositories. When in doubt, it’s advisable to use @Component as it serves as a generic stereotype annotation. However, using the specialized annotations can improve the readability and organization of your code by clearly indicating the role of each component within the application.
How to Integrate Spring
To harness the power of Spring’s IoC and DI features in your application, you’ll need to follow a series of steps:
- Develop a Configuration for Spring: Start by creating a configuration file (often applicationContext.xml or using Java Config with @Configuration classes) where you define beans and their dependencies.
- Define the ApplicationContext: ApplicationContext acts as the heart of the Spring framework, holding metadata about beans and managing their lifecycle. It’s where you configure your application’s components and their relationships.
- Extract Beans from the IoC Container: Once beans are defined in the ApplicationContext, they can be retrieved from the container using bean IDs or types. Spring manages the lifecycle of these beans, ensuring they are available when needed and cleaned up appropriately.
How to Configure Spring
There are various configuration options, each influencing interface implementation.
Configuration via XML
The code resembles that without Spring, with minimal impact. An XML configuration might resemble the following:

The code begins with Spring namespace references, followed by bean declarations:
- Engine. For example, the first bean is callable to retrieve an object of the V8Engine class.
- Car. This bean relies on the engine implemented through the constructor, though it can also be accomplished via a setter.
You must create a ‘ClassPathXmlApplicationContext’ class and pass ‘config.xml’ as arguments. Then, request the bean car from Spring. After that, the framework will automatically implement the necessary dependencies. Thanks to the config.xml configuration, Spring understands that there is a dependency on the engine for the car. It frees the developer from specifying the dependency of one class on another in the code.

Configuration via annotation
You can also create configurations in Spring using annotations. They help the framework understand where the dependencies are and how to work with them. In the previous example, you can remove all references to beans from config.xml and add a reference to scan the package for the @Component annotation.

After that, Spring will automatically consider beans as classes marked with the @Component annotation. Dependency injection points should be marked with the @Autowired annotation.

In versions post-Spring 4.3, applying @Autowired to the constructor isn’t necessary. If there is only one constructor, the framework will determine it as the point of dependency application. However, explicit annotation specification is required when setting an annotation on a setter.
Java-configuration
To implement Java configuration, delete config.xml and define configuration using a regular Java class annotated with @Configuration. Inside this class, define necessary beans.

The main disadvantage of this approach is that you have to manually configure the implementation of dependencies. However, it eliminates the need for class annotations, making it easier to switch ApplicationContext implementations.
If you choose between XML and annotations, each approach has its advantages:
- With XML configurations, you can separate application settings and business logic, which can be convenient. After all, you take the configurations out of the code.
- Annotations provide a visual representation of configuration directly in the code, enhancing readability.
In any case, the models are interchangeable. It is critical to adhere to one method throughout the development process.
How to Use @Autowired for Dependency Injection
When you understand Spring integration, you can focus on its key features and the framework’s impact on the application. A crucial starting point lies in understanding popular annotations, with @Autowired being one of the most prevalent. However, misuse of this annotation is common, often leading to confusion. Therefore, it’s imperative to understand its purpose and usage guidelines clearly.
The @Autowired annotation manages the process of injecting dependencies. You can apply it to any deployment point: constructor, setter, or field. After that, Spring can associate a bean with such a point. For instance, the illustration below demonstrates dependency injection via a setter annotated with @Autowired.

Next, you need to create a Java configuration and @ComponentScan annotation. It eliminates the need for explicit bean declarations in the code.

In general, @Autowired offers three methods for Dependency Injection:
- Injection via the constructor. It is the best solution when a dependency is mandatory or must be immutable (using the final keyword). This method simplifies identifying classes with multiple dependencies. If dependencies are implemented through the constructor, you will immediately notice a large number of parameters, which is not a normal situation.
- Injection via the setter. Suitable for optional dependencies or frequently changing configurations. It also allows you to define dependencies in the interface. However, if used for a critical dependency, it can throw a NullPointerException and crash the application. To minimize the risk, you should use the @Required annotation.
- Injection via the field. This approach is possible, but it is better to avoid it. First, this approach does not allow you to make the dependency immutable. At the same time, adding new dependencies is very easy, which is why there is a high probability of creating “superclasses” and overloaded code. Also, with this DI, there is a dependency on the IoC container, which forces you to rewrite a lot of code when replacing or removing the container. And finally, this method needs help with reflection when writing unit tests.
The choice between the first two methods is a subject of discussion even among the framework’s creators. Until version 4.0, they recommended setters. The reason is that a constructor can become too large if there are many arguments (especially if the properties are optional). However, in recent years, the recommendations have changed in favor of constructors. This approach allows you to create immutable components and ensure that the necessary dependencies are initialized correctly. However, you must choose the best solution for your project – or even combine both methods.
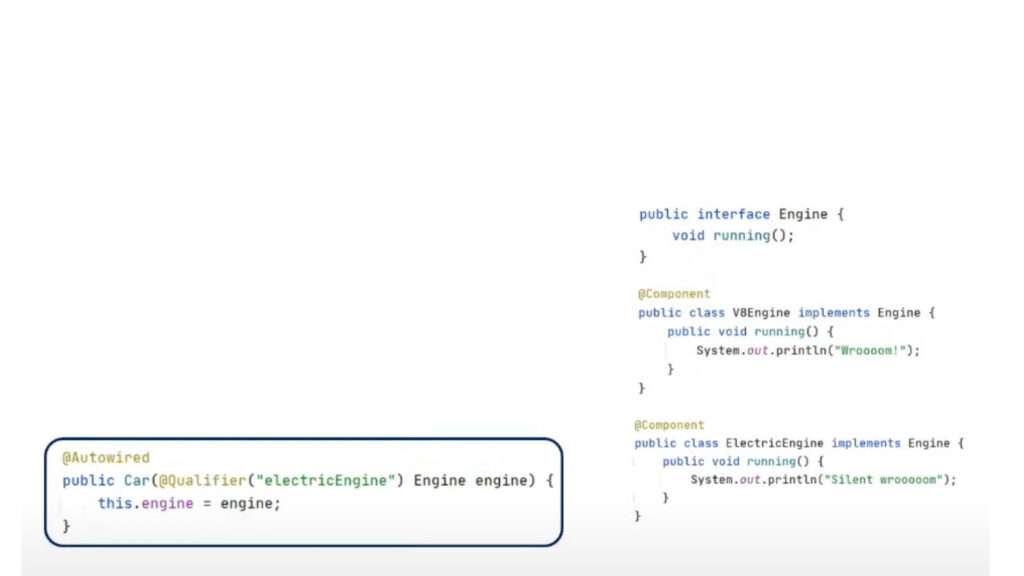
What is an Annotation @Qualifier
In the case of multiple implementations of an interface implemented with @Autowired (for example, engine, electric engine, etc.), an error occurs. To eliminate this ambiguity, use the @Qualifier annotation. It will point Spring to the correct implementation.

Additional Resources
The Spring Framework in Java programming is extensive and complex, offering endless discussions and nuances. However, it significantly streamlines development tasks. You can save considerable time on routine tasks by mastering object-oriented principles and delving into Spring intricacies. For further assistance, refer to:
If you are just starting out with Java, check out this article on how to learn Java for beginners.


